Wednesday, October 16, 2013

Parker's Crossroad Civil War Battle

Today we took a driving tour of the Civil War Battle of Parker's Crossroads in Tennessee which was considered a victory for the Confederate army back on December 31st, 1862.

You can watch a three minute video detailing the battle if you click here and then click on the movie icon under "The story of Parker's Crossroads" for a condensed version of the battle.

Probably the most famous saying that came out of this battle was what General Forrest of the Confederate States of America said when he found his brigade between two Union brigades, "Charge them both ways!"

To start our tour we drove to the Parker's Crossroads Visitor Center
 and picked up our Driving Tour pamphlet, which are also available at every stop of the tour. 
Parker's Crossroads Visitor Center
There are seven stops in the tour which only took us under an hour to drive.  You can easily control your time dependent upon how long you spend at each tour stop.  Below is a map of all the tour stops to give you an idea of its size.
Driving tour map.
As you reach each spot you can read the information provided in the tour pamphlet for that site along with the sign at each one.  Some of the sites also have walking tours which are displayed on the tour map.
Informational sign for The Battle of Parker's Crossroads.
Tour stop one is at the Parker's Crossroads City Park where you will also find the North Loop Walking Trail.  There was a nice playground for the kids too at the park.

Parker's Crossroads historical marker.

To read an account of the battle you can click here.  I'm just going to highlight the tour and not go into any real detail of the battle in this blog.
Tour stop one information sign.

One of the many cannons we saw while on the tour.
Tour Stop two is where it all began with the first shots being fired there.
Tour stop two information sign.
When you stand here looking over Hicks Field, you have to wonder what it was like for the soldiers who were getting ready to meet each other in mortal combat.  You also have to wonder what was going through all the soldiers' minds when the first shots where fired.
The left side of Hicks Field as it is today.

A lone tree at Hicks Field.

The right side of Hicks Field.

A 3 inch Ordnance rifle (cannon) just waiting to fire on the Union Army.

What the Confederates saw at Hicks Field.
What the Union soldiers faced at Hicks Field.
Tour stop number three is located at the Parker's Crossroads where Rev. John Parker's (a Union sympathizer) house was located.  When the Union Army placed artillery pieces in his yard he demanded that they be removed.  

When asked by a Union officer, "What is more important, the Union cause or your house?" he replied, "My house!"

Tour stop three information sign.

Looking north west from Parker's Crossroads.

Another 3 inch Ordnance rifle (cannon) on display.

Tour stop number four is located at the Jone's Cemetery where the Confederate soldiers would get water from its well.

Tour stop four information sign.

The well at Jones Cemetery.

Jones Cemetery.

Tour stop number five is where the Union Army lost their wagon train when the Confederates got behind them and sprang a surprise attack.  When the Union infantry counter attacked, the Confederates melted into the woods and disappeared.
Tour stop five information sign.

Location where the Union Army lost their wagon train to a Confederate surprise attack.

More of the area where the Union wagon train was captured.
Tour stop number six is where the Confederates pretty much had the battle won and were presenting their terms of surrender until another Union force attacked the Confederates in their rear at Parker's Crossroads.

Tour stop six information sign.
Red Mound which is named for the settlers who came from Red Mountain, NC.
A 30 pounder Army Parrott rifle.
You can clearly see the West Point Foundry initials and its size of 4.2 inches (30 pounder).
Tour stop seven is where the main battle occurred with the Union Army taking cover behind a split rail fence which when hit by Confederate artillery, would splinter and create even more deadly shrapnel in additional to the shrapnel from the artillery rounds.

This is also the last stop in the driving tour and is where the South Loop Walking Trail starts along with the Artillery Trail breaking off near the Union burial site.
Tour stop seven information sign.
The spot where the main fighting happened during the battle.


Tia, Ian, Ethan, Chloe, Courtney, and Avery standing on a Napoleon style canon.
Tia, Misty, Ian, Chloe, Ethan, Courtney, and Avery posing on the cannon.
Tia, Don, Ian, Chloe, Ethan, Courtney, and Avery on the cannon.
Below is a picture of the different types of artillery rounds used during the Civil War.  

Mostly canister rounds were used in this battle even though many letters of soldiers referred to them as grape shots, which were not used in this battle hardly at all.
Confederate artillery rounds.
The cabin in the below picture was reconstructed on the site to replace what was once there during the battle.  

It belonged to the McPeake family from Rock Hill, TN and was built in 1851.  The Garner family donated it to the Parker's Crossroads Battlefield Association in 2006.

This dogtrot style cabin was very common in TN during the 18th and 19th centuries.  A dogtrot cabin is a one story cabin where two rooms are built separated by a breeze way with everything being under one roof.
McPeake family cabin.
Side view of the McPeake family cabin.
Rear view of the McPeake family cabin.
Taking the South Loop Walking Trail that starts at Tour Stop Seven.
We really enjoyed the tour and history that was in the area.  It is hard to imagine that brother fought brother and American fought American on these grounds.

The kids were mostly interested in catching grasshoppers, running, and playing, but picked up some history also, which is always a good thing.

If you are ever near Parkers Crossroads, TN, you need to stop in and take the tour. 

Until next time, God bless and stay safe!


If you like to follow our blog, please register with Google+ and become a follower so we can see how many of you there are.  Also we would love for you to like our LivelyRV Facebook page and check in with us from time to time.  We would also love to hear from you, so do not be shy and give us some comments.  

Thanks!
Don, Misty, and Kids...


Wednesday, September 25, 2013

How To Become A Texan.

This blog will take you through all the steps it took for us to become Texas residence.  It is my intent to help answer some of the questions one might have on the subject. 

We do not claim that your experience is going to be the exact same as ours or that you will not have any difficulties by using our examples.  Also if the Texas residence requirements change from what they were for us, they will not be updated on this blog.

We decided to become Texas residence mainly for the home school requirements, which are easier in Texas than in West Virginia.  In West Virginia we had to register the kids every year with the county school board and then have their work evaluated by a licensed West Virginia teacher to be turned in to the school board by June 30th each year.

Meeting the above requirements, on the road, got a little complicated and was just one more issue to deal with.  Becoming Texans eliminates the issue and lets us concentrate on other matters.

As with anything that you are given complete control over, we have to stay disciplined with the home schooling so that we do not slack off and cheat our children out of an education. 

Another bonus is that there are no personal property taxes on our RV in Texas or state income tax, which saves us a pretty penny every year.

So even though our hearts will always be in West Virginia, we are now Texans and proud of it.  It is like I tell everyone now, "Just call me Tex."

The first thing we had to do is get a Texas address which we did through the Escapees Mail Forwarding Service.  We actually drove down to Livingston, Texas to the Escapees Headquarters and did all the paper work there.  It was easier this way, plus we had to physically be in town anyway to become Texans.

The amount for the first year of service is $185.00 which pays for all the start up costs and your $50.00 of postage on-hand.  The next year will cost $85.00 for the annual fee along with you maintaining the $50.00 for postage.  You can read more about their rates by clicking here.

If you go to the link of Postal Form 1583 With Mail Service Contract you can download pdf files of the forms you will need to fill out.

The booklet titled, "How To Become a Real Texan" also on the above page will explain everything required of you to become a Texan.  This is actually what I used to get started when we decided to become Texans.
Escapees book on How To Become a Real Texan.
When you come to Livingston to Escapees headquarters, they give you a step by step list of what you have to do to become a Texan with a map which makes it pretty easy.

After we received our new Texas address we took our vehicles to Harrison Body Shop located at 1806 N Washington Ave, Livingston, TX 77351 and had them inspected.  

They are open Monday through Friday and all you have to do is call so they know you are coming.  I do not know whether they do travel trailers or fifth wheel inspections, but they do inspect regular vehicles along with class A motor homes.  Their phone number is 936-327-4338.

After we had our out of state vehicle inspections done, we took the inspection paperwork, our West Virginia registrations, proof of insurance (that we had changed to Texas) and a filled out Texas DMV Form 130-U to the Polk Count Tax Assessor Office in Livingston and registered the vehicles.

For a pdf version of the Form 130-U you can get a copy at the TxDMV website.

After we had the vehicles registered it was time to go apply for our driving license.  Now if your RV weighs more than 26001 pounds and your tow vehicle does not weigh more than 10000 pounds, then you are going to be required to get your Class B non-commercial license, which means you will have to take a written and a driving test. 

I'm not going into detail on this, but this is what we had to do in our situation since our Fleetwood Discovery 40G GVWR is 32,400 and our tow vehicle GVWR is 8000.  You can go to the Texas Department of Public Safety website for the specifics on the different classes of license.

Sounds scary, but it really is not.  Both Misty and I passed the written test and driving test on the first tries, because we studied and practiced.  We probably would have done fine with the driving test, without practice, but since we did practice, we knew all of the ins and outs of the course.

First we filled out a Drivers License Application (DL-14A.pdf) and then headed to the Drivers License Office in Livingston.  We had to have our vehicle registrations, proof of insurance (which we changed over to Texas after getting our TX address), and West Virgina drivers license. After filling out a couple of other forms they give you there, we took our eye test, had our picture taken, and took the written test.

For the written test all we did was study Chapter 14 of the Texas Commercial Drivers Handbook (DL-7C.pdf) and did fine on it.  It is a 20 question test that is given to you on a computer. 

After passing the written test, we were scheduled for our driving test, which was a month later.  So we just stayed in Livingston at the Escapees Rainbow's End campground.

RV parked in front of the Livingston, Texas Drivers License Office to take our driving test.
As I mentioned earlier, we figured out what the route was for the driving test and actually drove it ahead of time, which helped a good bit.  I feel we would have passed without the practice, but it really helped Misty, just to know what was coming up.
Livingston Texas Class B Drivers License Route.
Looking at the above picture I will try to lay it out for you.  I used colored circles and arrows on the map to try and show the route easier.  These are for the blog only and are not really on the route you drive. (So in the below route instructions, the colored circles referenced are only for the above route map.)

All that was required for the driving test was the tester to check that all of our flashers, brake lights, and horn worked on the RV and then have us drive the below route.  There were no technical questions asked, such as "how to do an air brake test?" and no parallel parking.

Starting at the (green circle) in front of the Driver License Office on N Washington Ave drive south to 190 W Church Street.

At the (blue circle) turn right on 190 W Church St and drive west.  Drive west on it until the US 59 Loop-N.

At the (red circle) turn right on US 59 Loop-N feeder road.  Drive on the US 59 Loop-N until you reach N Houston St.


At the (orange circle) turn right on N Houston St.  


After crossing RR tracks turn right at the (yellow circle) on N Washington Ave and drive south. 

Once you reach Allie Bean Dr (pink circle) turn left.  This is the street that they will have you back up in a straight line on for about 20 yards.  Follow it to N Houston St.

At N Houston St (purple circle) make a left and follow the street back to N Washington Ave.

At the (teal circle) turn left on N Washington Ave and drive south until you are back in front of the Driver License Office.

Easy peasy lemon squeezey!

After passing the driving test you will be issued a printout with your license info and photo as a temporary license until you receive your permanent license in the mail.

We also signed up for our voters registration cards off of our drivers license applications.  You can either get them then or when you register your vehicles, but why fill out a drivers license application and voters registration form when the drivers application will suffice for both?

So now we are 100% Texan.

I hope that our experience will help someone else to become a Texan without any problems.  I had all sorts of questions and fears heading into it, but now know that there really was nothing to worry about.

God bless!

Thanks!
Don, Misty, and Kids...


Wednesday, September 18, 2013

How To Install A Futon In A RV Bunkhouse

One day Misty told me she had a great idea for the RV bunkhouse.  She said that we should install a futon to replace the bottom bunk so that the kids would have a bigger sleeping area.

So after thinking on it for awhile, I came up with the idea of installing a futon to replace the bottom bunk in the bunkhouse!  This way the kids would have a larger sleeping area that could be stowed easily when we put in the slides.  

I'm not sure how I come up with these great ideas?  They just seem to come to me somehow.
Original bunk with the mattress removed.
After measuring the area and looking up futons on-line, I determined that there was enough room to install one.  I figured that I would use some type of drawer slider to enable the bed to slide in and out, but had to abandon that idea once I got started.

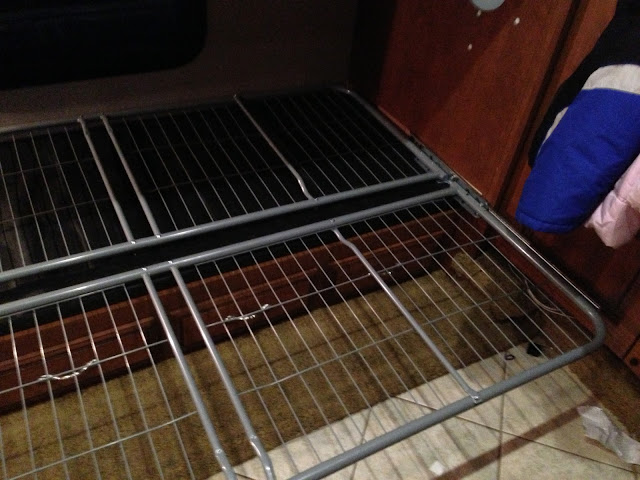
I went to our local Walmart which had a Mainstays Metal Arm Futon on display that I could get measurements from.  After I measured the frame length, width, and height, I decided to buy it.
Futon I purchased at Walmart to install in the RV bunkhouse.
I went with their cheapest one since the dimensions were just about perfect to fit in the bunkhouse space. Also since I knew I would really only be using the back panel, seat panel, and mattress I did not want to pay for wood arms or anything.

After buying the futon I went to Lowe's and bought some drawer slides to mount it with.  The ones I purchased were the 16 inch ones that are rated to hold up to 100 pounds.  (The results are not in yet, but I am considering upgrading to a larger slide like a 22 inch that can hold 200+ pounds now.  The kids are being a lot rougher on the current slides than I anticipated.) 

Since the bed was really only for the kids, I figured the slides would support them fine.  Misty and I would probably never be sleeping on it anyway and even if we did, I think it would support Misty if she slept on the extended side.
Drawer slide I bought at Lowe's.
After buying the futon I put the seat and back panels together and made sure they fit in the bunk area.  
Fitting the right side of the futon panels to make sure they fit.
Fitting the left side of the futon panels to make sure they fit.
I laid out both panels as if the futon was folded out to get my marks for the slides.  The main thing here was to ensure that the back panel had room to lay down flat.  

I then marked the panel along with the bunkhouse where the slides would go.  I also figured out how thick of a spacer I would need to make up the difference from the length of the seat panel.
Figuring out where to mount the right side slide.
Figuring out where to mount the left side slide.
Next I had to attach the slides to the seat panel.  To do that I used a level to make sure the slides were level and marked my holes.  I then drilled them out using an 1/8 bit and attached with metal screws. 
Using level to make sure the slide attachment is level.
Slide attached to right side of seat panel.
On the left side I used a piece of the oak sub-board to space the slide out about 1/4 inch to enable the slide to get past the bunkhouse trim.  I also used the same type of sub-board to put the hinge up approximately 1/4 inch off of the bunk base.
Attaching slide to left side of the bunkhouse wall.
I attached the right side drawer slide to the bunkhouse walls using a spacer board to get the correct distance between the slides, ensuring that they were also level.  The spacer ended up being a 1 x 2 inch board 30 inches long.

I used the same piece of oak sub-board to put the slide up above the bunk base on the right side too approximately 1/4 inch.  That left enough clearance for the futon seat and back panels to slide in and out.
Attaching slide to the right side of the bunkhouse wall.
Originally, I wanted to keep the hinges that came with the futon, so that the seat and back panels were hinged and would make it easier to slide in and out.  Unfortunately the hinges were too wide and interfered with the slides so I had to think of something else.

My next solution was to buy some slimmer hinges, but they too were hitting the slides, so I had to do something else.  If I could have found some flip hinges that had the hinge on the back rather than on the side, I could have made that work and one day will, but for now I improvised. 
Seat panel and slides fully connected so that it will slide in and out.
Using zip ties that I had left over from installing the heater ducts in my old house, I fastened the back and seat panels together.  It is not a perfect solution, but will work until I get the hinges I want.

As you can see the bed lays out perfectly and gives the kids almost twice the sleeping room.
Using zip ties to hold the back and seat panels together.
Right side view of zip ties used to keep the panels together.
Left side view of zip ties used to keep the panels together.
We are very happy with the modification and think it has really helped improve the kids sleeping arrangements.  We have the queen sized sleeper sofa that we use, but it is a little bit harder to set up than our new futon. 

Right now since the kids are not that big, four of them can sleep easily on the futon if they put their heads toward the window, which leaves the top bunk open and then the sofa, which does not need pulled out now.
Futon fully extended with mattress.
The next morning all that has to be done is push the futon back in and the kids have a couch to sit on, all their own.  

One down side is that it covers up the window when pushed in, but that is really not that big of a deal.  Another down side is that it is harder to get into their cabinet or shelves since only the left side door can be opened when the futon is in the couch position.  But that is a small price to pay for more sleeping area.
Futon pushed back in.
We are sure there are probably better solutions or methods to increase the sleeping area in the bunkhouse, but we are very happy with the results.  It took about six hours of work and cost around $145.00 total with the major cost being the price of the futon.

Also you do not use any of the frame for the futon, so be prepared to either give it to someone or a local recycling center, which is what we did.  The left over piece of 1x2 wood I will keep though, since you never know what I may need it for in the future.
Left over parts from futon that we did not use.
I would not even want to guess how much it would cost if we had a professional do the work.  Sure the product would probably be more efficient or elegant, but we are happy with this simple fix.

So if you want a quick and easy way to increase your sleeping area in a bunkhouse on a Fleetwood Discovery 40G, you can do what we did and install a futon.

I may also have to add legs to fold out on the extended part of the futon, so that it can support more weight.  Even though I tell the kids not to roughhouse on it, kids will be kids and I am afraid that two or three of them jumping on it will exceed the 100 pound limit and make the slides fail.  As I mentioned earlier in this blog, I may also go with a bigger slide that can hold more weight, but will see what happens with the current ones over time.

I also realize that my instructions are not very detailed, so if you need more details, leave me a comment and I will tell you all that I know. (Which is not that much!)

All of my plans were in my head and the end product was completely different from my original concept of how I was going to do it.  

My original design include a slide out drawer that the futon would have been mounted on, but after fitting the futon panels, I determined there was not enough room for a drawer and the final solution was much easier.

We are so blessed in our fulltime RV lifestyle and pray that God keeps his blessings upon us and all of you too.  We accomplish something everyday and overcome any and all obstacles.

For with God nothing will be impossible.  (Luke 1:37)

If you like our blog we ask that you please follow it and also like our LivelyRV Facebook page.  Also comments are always welcome.

Thanks!
Don, Misty, and Kids...